Menus

Menus are a great way to organise and help viewers navigate easily around your website.

When you create a page and a post you will need to organise them accordingly.

On the left hand side bar select appearance and choose menus. If you want a page to appear on your menu bar you need to add the page to your menu by selecting from your posts and pages on the right panel. If you want a page to appear as the first topic on your menu bar you need to move the box fully to the left. If you want a post to appear under the page in your menu then the box needs to be moved slightly to the left so it looks like ouse made a indent.

This is a example of my menu bar. As you can see all my main pages are seen first on the menu bar, until you hover over the page then it provides a drop down bar where you can choose the relevant post.

However, the top level domain page had two bits of information that I felt needed 2 pages so I created two sub menus under top level domain.screen-shot-2017-02-10-at-12-13-25screen-shot-2017-02-10-at-12-08-44

Setting up WordPress & Customise

To begin I went to the WordPress site and created an account where I then had to create a unique URL that hadn’t been used before. I chose digicomhowto.wordpress.com.

I decided to choose digicomhowto because our assignment is Using Digital communication to develop a website. I then had to confirm my email address.

After I had set up my account I went to the admin page for WordPress by adding /wp-admin to the URL of my site. I then went onto the appearance page and customised the free template “twenty eleven”.

I decided to change the layout of my blog as I wanted to make the blog feel like an informative website. To get into the appearance settings there is a tab on the left of the screen called appearance and then select customise. I decided to select one column with no side bar as this looks more like a website than a blog.

After reviewing my website I felt it needed a better header. To personalise my website I  used Adobe Illustrator. With the use of the shape tool and swirl tool I created a simple header design that looked professional enough to go on an information website. As I was experimenting with different header colours on Adobe Illustrator I uploaded 3 different types of headers. It then occurred to me that you could upload a number of headers and randomise the ones you selected. This means each time you select a new page or click a link the header image would change. I thought this option was a small but effective setting to make my website more interesting.

To make my blog feel more like a website I wanted to make a static front page instead of having my latest blog posts on the front page.  

I then chose the colour theme. I decided to choose white because my header had white throughout. There are default colours you can select or you can choose a colour from the colour wheel which gives you a lot more choice.

I think Font is really important, on a website it needs to be easy to read and titles need to be more definitive. I chose “Cinzel” as my title font in bold and “Lato” as my contents font as its not to small and is a serif font.

On certain themes you have the option of deleting the date stamp on each post, however, my theme doesn’t allow you to do this. This could be classed as a limitation as you can’t make it 100% personal.

To see how to use WordPress please visit Internet communication methods – Web blogs as I go into depth about how to create a post and page with media and hyperlinks, how to use categories, how to see comments and how to follow people.

Plugins

Plugins can consist entirely of a widget, or add lots of functionality including a widget. Plugins are the way we extend our WordPress sites, and widgets give us a way to display special content outside of posts and pages. A common plugin is the social media plug where you can instantly share a post via most social media websites. This is a great way to advertise a post and your website if viewers are sharing posts they enjoy. 

To add a plugin onto your website you need to select the relevant plugin, I chose the social media plugin. Then you have to select what icon/button you want to be seen.

I then decided I only wanted the share plugins on my posts and not on my main pages.

This is what the bottom of the page looks like on each page.

Widgets

I then edited all the widgets on my page as many were there by default, I only kept relevant ones like the search widget, the category widget and the follow my blog widget. I decided to keep these widgets on my blog because I felt it was important to make the website easy to navigate. For example if someone was looking for a post they can easily search for it at the top of the page. I made sure I had a static home page because this was the first page I wanted people to see.

To edit Widgets you can go to the sidebar and select appearance. Here there will be a list of widgets that you can add to your website. I personally didn’t like the look of widgets on my website as I felt this made it look more like a blog.

I viewed my website and realised the widget in the footer area called categories made the page look untidy as seen in the picture above so I changed it to a drop down bar instead.

WHAT IS A WIDGET

widgetboxscreenThe word widget is a term for self-contained code that displays a program, or a piece of a program, that is usually a shortcut to a larger application. The most common place for a widget area is a sidebar.

Tagging content

Tags provide a useful way to group related posts together and to quickly tell readers what a post is about. Tags also make it easier for people to find your content. Tags are similar to, but more specific than, categories. tags can be displayed at the top or bottom of posts, on the individual post view, and/or in the sidebar. You can assign multiple tags per post.

To tag on WordPress there is a tagging section on the right sid bar. Type your specific tags by separating each one with a comma and then select add.

Once you’ve added your tags they will appear below, you can choose to get rid of them by clicking the “x”.

If you want to tag in another post and have similar tags as previous posts, you can select “choose from the most used tags” and all your popular tags will be listed.

To add the tag widget to your posts, go to appearance on the left sidebar and select widgets. select the “Tag cloud” and drag it to whichever footer area you want it to be seen. Then you can select the number of tags shown, the title and you choose to exclude certain tags.

Once you’ve saved your settings the bottom of your posts will look like the picture below.

Meta Data

Metadata summarizes basic information about data, which can make finding and working with particular instances of data easier. For example, authordate created and date modified and file size are examples of very basic document metadata.  Having the abilty to filter through that metadata makes it much easier for someone to locate a specific document.

Google Analytics

Google Analytics provides statistics and basic analytical tools for search engine optimization  and marketing purposes. The service is available to anyone with a Google account. Google Analytics is suited toward small and medium-sized retail websites. The service has limitations that make it less suited to more complex websites.

Why Tagging is Important

Tagging is a good way to make you work appear more visible for viewers. For example, if someone was to search “text” and you had tagged multiple posts with the tag “text” then your post is more likely to show up on someone’s searches. Once a viewer has been directed to your site and they read your post they can also go to other posts that have the tag “text”. Tagging is a great way to keep a reader on your website.

Adding new content

Adding content to a website is so simple as long as you know where the upload option is. There are many websites that you can upload content to, YouTube being one of the main ones.

To upload a video on to YouTube go to your home page and click the line and the arrow icon at the top right hand corner.

You will then be taken to the page below. Its your decision whether you want your video to be public or private. Then select the arrow in the middle of the page.

Youtube will then bring up your devices folders where you can choose what you would like to upload.

Once you have chosen the file to upload, the page below will appear. this is where you can put a title for your video and a description.

Depending on how big your video is depends on how long your video will take to upload. Once your video has upload to Youtube, it will give you a link as to where your video is.

When you click on the link you will be able to see your video in Youtube format.


Pinterest.

Pinterest is a form of social media where you can pin pictures to your own personal boards. Pinterest is classed as a photo sharing website.

To upload a image onto Pinterest, select the plus button at the bottom right hand corner and click the upload pin button.

Like most websites where yo can upload content, it will bring up your files on your device. I chose a picture of a cake to upload.

Then the website will ask you where you want to pin it. As I have a board called desserts i decided to pin it to that board.

Once you’ve pinned your picture you will be able to see it in Pinterest format.

The advantage of Pinterest is that you can keep everything organized and share the things you love all in one place by creating your own board and adding pins to it. You can always go back and view your Pins whenever you want. A disadvantage is that anyone can use your pin to market something, unless you have a copyright symbol on all of your own pictures.

Internet information sharing

Internet Information sharing is when one person puts up information on the internet, this can be in the form of  anything you can upload to a computer or phone for example pictures, video and text.

Examples of internet sharing programmes are Dropbox or google drive, which allow you to share anything you want with whoever you want. These programmes allow you to choose specific people to share information with. This is a method for personal cloud storage. It is commonly referred to as a method to backup files online. However these programmes limit how much space you are allowed. If you want more space to share information you will have to pay a monthly fee which will give you lots more space. For example dropbox offer you 5GB of space free of charge. After you fill that up you have the option to delete information so it frees up your 5GB of space or you can pay £7.99 a month for 1 terabyte  of space.

Once you’ve signed into Dropbox you click the upload button at the right top of page.

It will then ask you to choose a file to upload to dropbox.

Once you’ve chosen your file it will upload it, this may take a couple of seconds or minutes depending on how big your file is.

Once you’ve selected done it will show up in your recent files.

Click on the share button besides your file. You will need the recipients email address to be able to share the file with them.

Once you’ve selected the email address of the recipient you can add a message and select share. Only the people you have chosen will be able to see the file.

The advantage of using Internet information sharing is you get to choose who you can share information with and you can send bigger files via dropbox than you can email. Dropbox is extremely convenient and easy to use.

Social Networking

Social networking is the practice of expanding the number of  business and/or social contacts by making connections through individuals, often through social media sites such as Facebook, Twitter, Instagram and Linkedin.

When you open up Instagram you will see your feed, which is all the people you follow and there pictures. Here is a example of my feed.

You can also like pictures by clicking the heart button. Once you have liked it the heart will turn red.  

You can also comment on peoples posts by clicking the speech bubble next to the heart. This will then bring up the screen below. You can write you comment in the bar at the bottom of the page. Then once you have written your comment you click post and then everyone who follows that person will be able to see your comment.

You can also send pictures or posts via Instagram messages by clicking the paper aeroplane icon next to the speech bubble. This will then bring up this page bellow. You will have to select the friends you want to share the picture with.

You can also search people, tags and places by clicking the magnifying glass on your homepage.

If you want to upload a photo you just press the little plus button at the bottom of the page. This will bring up the screen below, you can then choose your picture from your library on your device. Then select next.

You can apply filters to your picture.

And you can adjust the pictures qualities.

Once you are happy with the editing of the picture, you can give it a caption

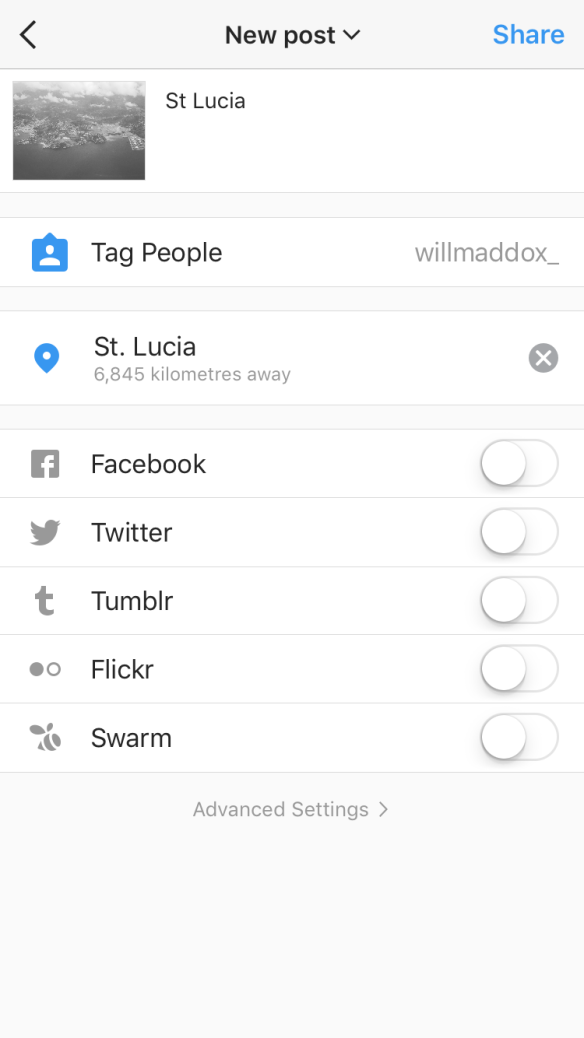
You can also tag people in the picture by typing there name in the search field.

You can also set the location of where your photo was taken.

Once you’ve posted your photo you can see who’s liked, commented and followed you by clicking the heart at the bottom of the page. This will bring up the screen below.

If you want to see what other people are liking and commenting on from your friends list you just click following at the top of the screen and this will show this screen below. 

If you want to view your own personal profile you can click the little person symbol at the bottom of the page. This page is where you can delete photos or edit your profile information.

Social networking has many advantages as you can easily communicate with anyone. You can also update friends and family easily. A disadvantage of social networking is that people can easily say there someone completely different and pretend to be someone you know. This is why its important to only accept friend requests from people you know. Social networking has also increased identity theft as its so easy to get hold of people personal information and pictures.

Conferencing

Video conferencing means using computers to provide a video-link between two or more people. Instead of just talking to someone by telephone, you are able to see them as well. This communication method can be used for work or general social life.

The following is needed to take part in a video conference call:

  • a computer/phone
  • a web cam
  • a microphone (most webcams have a microphone built-in)
  • speakers
  • broadband Internet access
  • video conferencing software

Advantages of video conferencing

  • Meetings can take place without leaving the office.
  • Travel costs and the time taken to travel can be reduced significantly.
  • You can plan social events or speak to friends that live far away

Disadvantages of video conferencing

  • May not be as productive as a discussion around a table.
  • If one persons connection to the internet is weak it can be difficult to hear or see the person.
  • There will always be times when you need to be able to meet face to face.

A great video conferencing software is Skype. It allows you to phone anyone in the world along as they have a Skype account. To start a group call you need to select your recipients.

Click the pencil within the square to start a new conversation. 

Then type the recipients names in to the ‘to’ field. Once you have selected your recipients click the video camera to start a video call.

This screen will appear on your phone or computer. Accept the call with the green button.

And then you will be able to see all of your recipients. If you would like to start a Audio call (often known as audio conferencing) then you simply press the phone icon. 

Then this screen will appear. You will have to wait until everyone has accepted the call before you can hear everyone. Again you can mute the conversation, put the conversation on speaker and switch from audio to video.

As you can see at the top of the screen, it will tell you how many people have accepted your call for example only 1/2 have accepted this call.

And then quickly after the 2nd recipient accepts the call.

You can also add people to the audio call by clicking the Add button this will then bring up the screen below.

Once the call is ended you can see how long your conversation was and you can message the recipients after the call.

Internet Telephony

An Internet telephony service provider (ITSP) offers digital telecommunications services based on Voice over Internet Protocol (VoIP) that are provisioned via the Internet.

Facebook messenger offers a VOIP service that uses wifi and cellular data only. Firstly you choose the friend you want to call  in your friend list. then you choose either the telephone icon or video icon to start your call. If there is a green dot next to the telephone icon this means that your friend is online and ready to chat.  

Then this screen will appear until your friend accepts the call. You have the option to put the conversation on speaker or mute the conversation. You can’t switch to video chat until the friend accept your call.

Once the friend accepts the call it will display a timer and you will be able to switch from video to audio. Once you have finished the conversation you can press the red button at the bottom of the screen which will end your conversation.

Once you’ve ended the call it will show you how long your conversation was and you will have the option to call that friend back again.

FaceTime is a feature on apple products which allows you to video chat with someone using wifi or cellular data.

When you chose one of your contacts it will give you the option to message, phone and FaceTime the recipient. The FaceTime icon is the video camera.

Once you select the FaceTime option it will bring up your camera and it will start to ring the recipient. You have the option to flip your camera so its facing you or flip the camera so its facing the other way.

Once the recipient accepts your call you will be able to see them clearly. you will also have a small box showing what your camera is showing them.

When you want to end the call tap the screen and click the red button to end the conversation.

The advantages of using Internet Telephony is that its free if you use wifi and cheap if your using it on your cellular data plan. However if your connection is weak when using wifi or cellular data then your phone call will become broken up and you may not be able to hear the recipient very well.